In this article I have discussed in some detail the subject of welding positions. The entire discussion has been done in reference to the Section IX of ASME Boiler and Pressure Vessel Code (BPVC).
I have been a welding engineer for more than nine years. One question that has always troubled me about the welding positions is this: In the table QW-461.9, why is it that the Section IX sometimes uses the nomenclature 1G, 2G… and 1F, 2F… , while sometimes it uses ‘flat’, ‘horizontal’, etc…. for the welding positions. Why can’t it stick to any one system?
Why would Section IX resort to two different systems? Aren’t 1G and flat position same? Aren’t 2G and horizontal position same? Are 3G and vertical position any different? What about 4G and overhead position?
Searches on internet do not throw up helpful answers to these questions either.
Another thing that bothered me for a long time was the figures given in QW-461.1 and QW-461.2. These two diagrams are notoriously difficult to understand. Welding engineers around the world have wrestled with these two figures for a long time to extract meaning out of them.
Have you been troubled by these problems too? Read this article to get some relief. Here I have tried to bring some clarity on the subject of welding positions vis-à-vis ASME Section IX.
1G, 2G… – These Are Test Positions
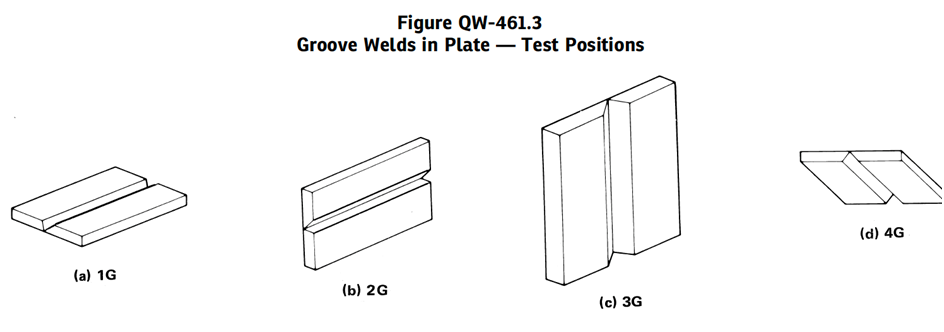
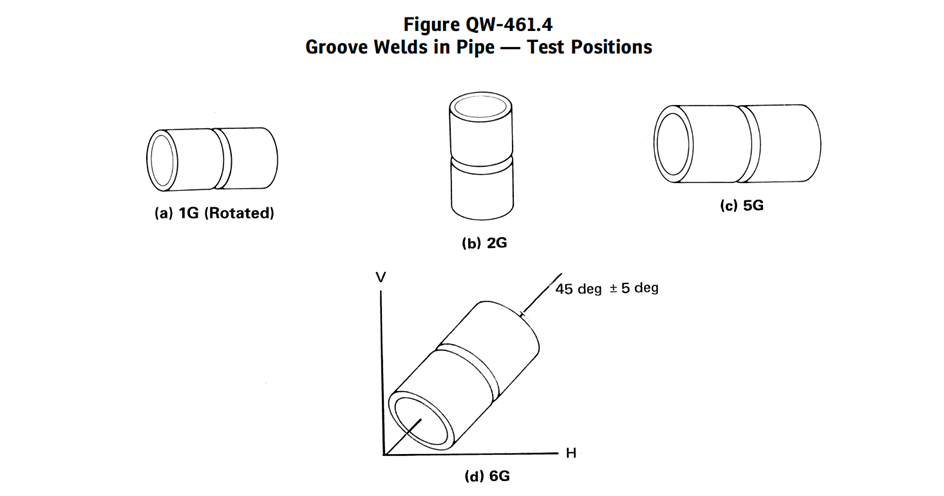
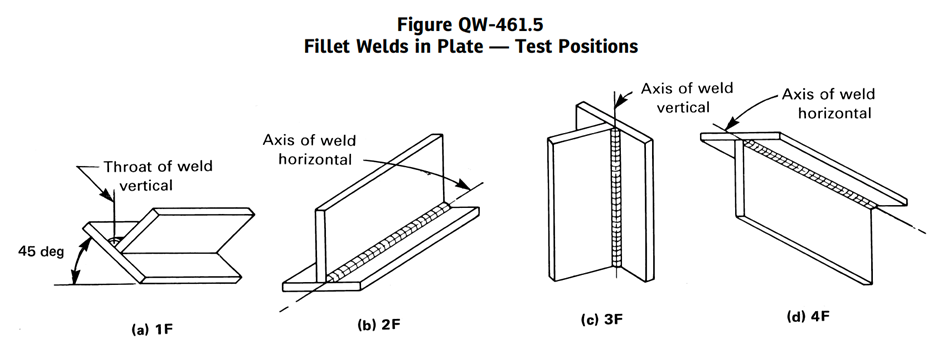
It gets missed from the attention at first, until someone else points it out to us. As it says at the top of QW-461.3, through 461.7, these positions are test positions. That is, we are supposed to use this terminology only when we are making test coupons.
It becomes clear on perusing the table QW-461.9 too. The terms 1G, 2G…etc. are used for describing positions in qualification test coupon. These terms are therefore referred to as test positions.
This also becomes clear on perusal of QW-120.
The standard test positions (1G, 2G, …etc.) for plates are shown below:
The standard test positions for pipes are as below:
And the standard test positions for fillet welds are as below:
Flat, Horizontal … – These are Positions For Production Welds
For production welds, it is more appropriate to use the terminology involving the terms flat, horizontal, …etc. for describing positions.
In other words, the terms flat, horizontal, etc. are used for describing the qualified weld positions (that is, positions in production welds). These terms are therefore referred to as weld positions or welding positions.
The weld positions are explained in Section IX through the following two figures, which have tormented welding engineers (including the author of this article) for over 7 decades.
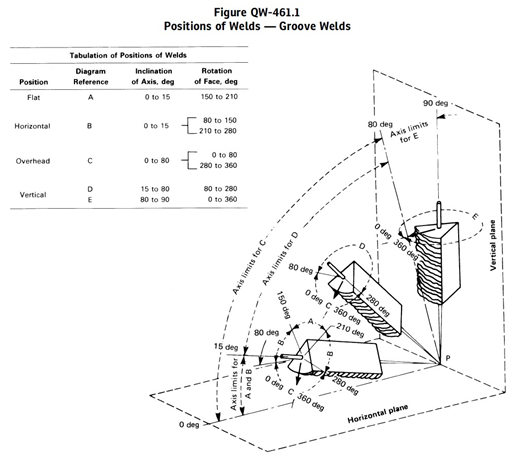
The above diagram explains weld positions for groove welds. Weld positions for fillet welds are explained through the figure below:
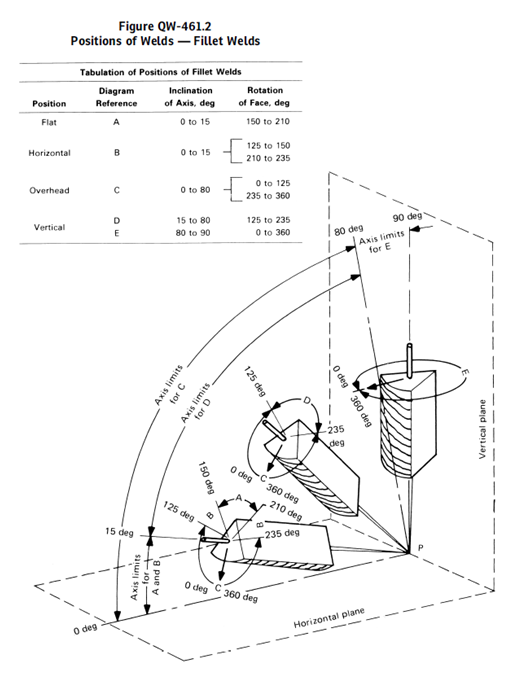
It is widely said that these two diagrams are a tough nut to crack. However, once one understands them – these are not un-understandable diagrams.
Why This Distinction b/w Test Positions and Weld Positions?
This distinction is made because the welding position in production welds cannot be predicted. However, for test coupons – standardization can be done. The Section IX has defined standard test positions in the form of ‘G’ and ‘F’. Each of these terms is a discretely defined term that has a limited scope.
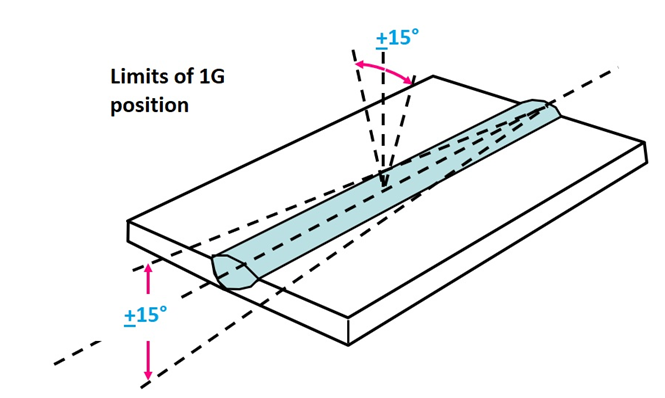
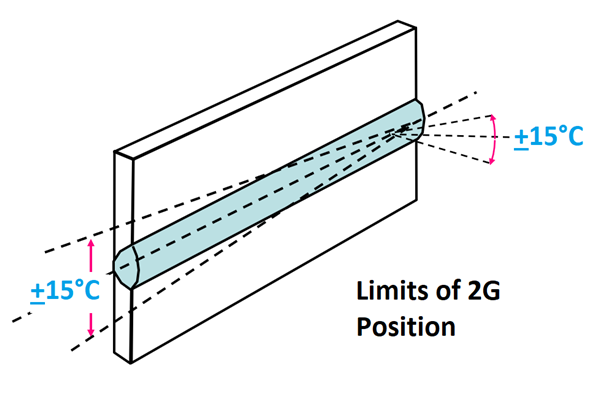
The terms 1G, 2G, … for groove welds, and 1F, 2F, … for fillet welds are as depicted in figures 1, 2 and 3 above, except that an angular deviation of +15° is permitted for the specified horizontal and vertical planes, and an angular deviation of +5° is permitted for the specified inclined plane during welding of test coupon.
Here is how the expanse of 1G position looks like:
The expanse of 2G position looks like this:
Likewise, the extent of rotation permitted for 3G and 4G positions also is only +15° from the test position indicated under QW-461.3 (shown above).
On the other hand, in production welding – the positions can occur in any position. For example, a plate rotated such that its weld axis is 16° to the ground would not fall in any of the test positions. So, ‘G’ and ‘F’ positions are clearly not adequate to describe properly all the positions that can occur in production.
Hence, there needs to be another system that can designate all positions that can occur in production under one uniform nomenclature. This is where the figures under QW-461.1 and QW-461.2 come into picture. The terms ‘flat’, ‘horizontal’, ‘overhead’ and ‘vertical’ are enough to cover any position that may occur in production.
In other words, these are contiguous positions.
It is due to this reason that there a two different systems to designate positions: on system for describing test positions, and another system for describing positions that can occur in production welds.
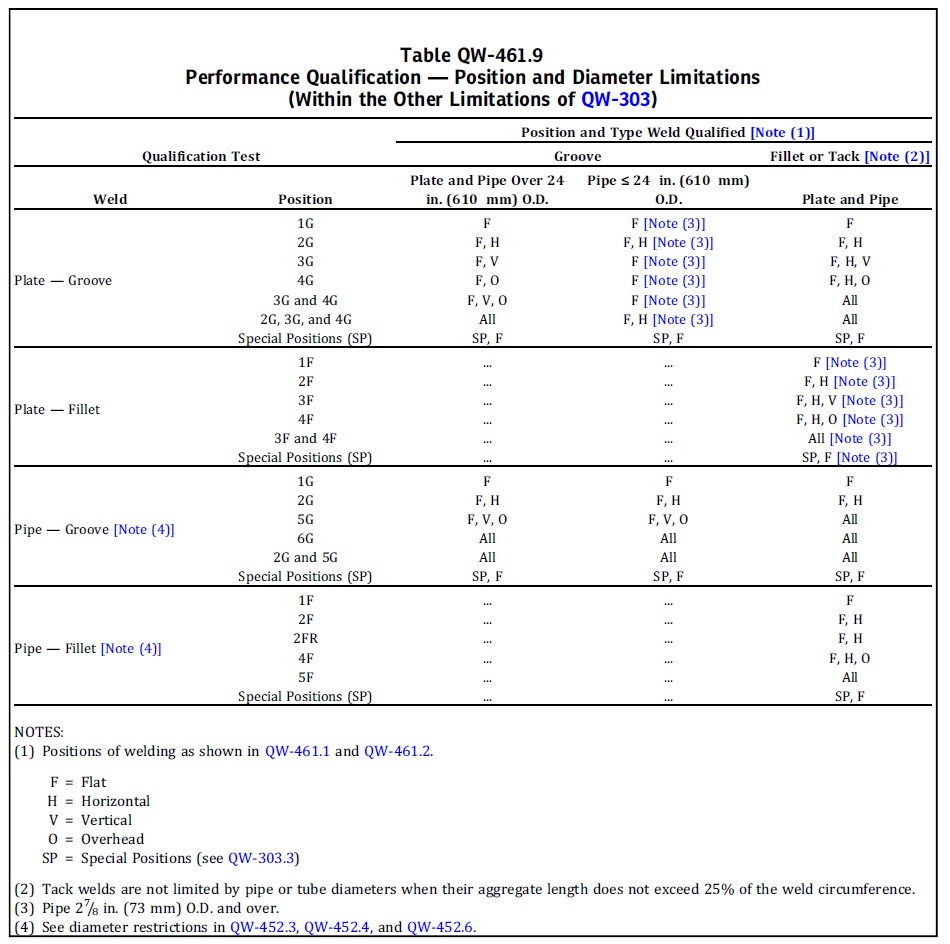
The table QW-461.9 in Section IX performs the function of connecting us from test positions to welding positions. In other words, when a welder has qualified on a test coupon in a certain position, what positions is he qualified to weld on the production joints? The answer to this is given in QW-461.9.
Here is a snapshot of QW-461.9.
1G Position vs Flat Position
What Exactly Is Flat Position? How Is It Different From The 1G position?
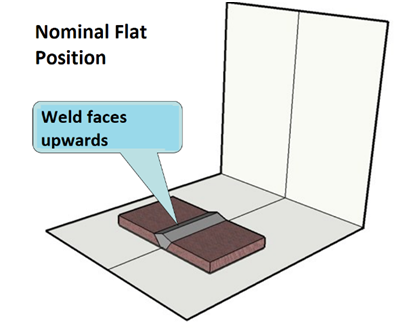
The nominal flat position is this, as shown below. It is same as the nominal 1G position.
The weld axis is allowed to deviate by 15°, for flat position. When the inclination of axis becomes 15° it looks like this.
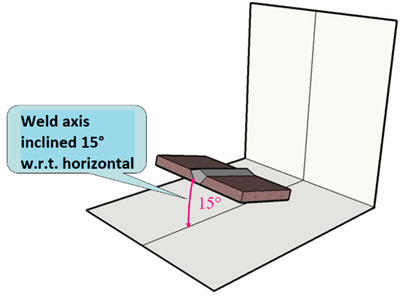
The inclination of axis is permitted in the downward direction is also permitted.
So far, the flat position is same as the 1G position.
The rotation of face in flat position can vary from 0° to 30°, as shown in the figure below. This rotation is permitted for all inclinations of axis between 0° to 15° shown in the above figure, both in the upward as well as downward directions.
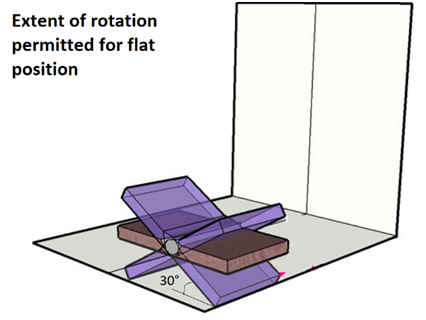
Note that the permitted angle of rotation of the face about the axis is thirty degrees (not 15°) for flat position.
The above three figures represent the total expanse of the flat position. Compare this with the measly 15° deviation permitted for the 1G position from its nominal position.
So, in summary – the inclination of weld axis for flat position can vary between 0° to +15° (this is same as the 1G position). And, the angle of rotation of face about the weld axis can vary between 0° to +30° for flat position (as compared to only the +15° for 1G position).
The 1G position is again reproduced below for reference.
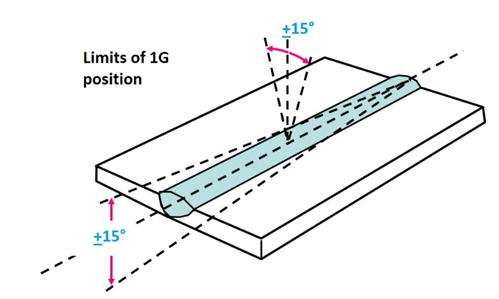
So, the moral of the story is that – flat position and 1G position are not same. One can say that 1G is a subset of the flat position. But unlike what most people believe – these two terms are not equivalent.
2G Position vs Horizontal Position
What Is Horizontal Weld Position? Is it the Same as 2G position?
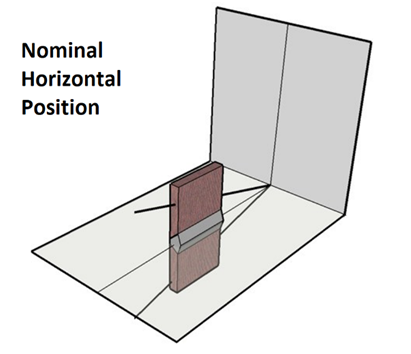
The nominal horizontal position looks like this, as shown in the figure below.
The weld axis is allowed to deviate by 15°, for horizontal position. When the inclination of axis becomes 15° it looks like this.
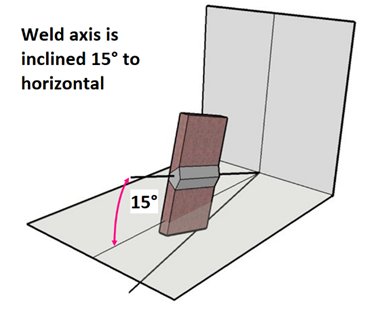
The inclination of axis is permitted in the downward direction is implied.
So far, the horizontal position is same as the 2G position.
Now let us see how the horizontal position looks like when face of the weld is rotated to its extremes defined in QW-461.1.
The limits for rotation of the face are given as 80° to 150° and 210° to 280° in the figure QW-461.1.
The rotation of face begins when the angle of plate is 30° with horizontal plane. See figure below.
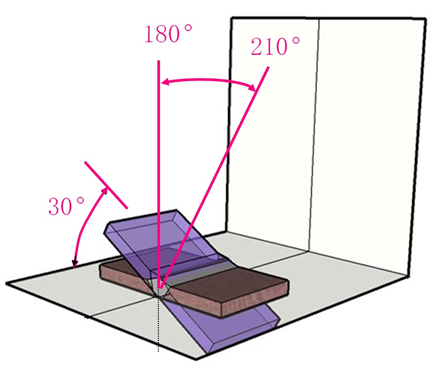
Here is how it looks like when seen from the cross section view of the butt weld.
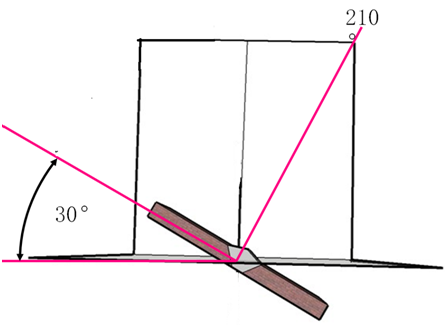
Note that this position is where the limit of flat position ends. This means that the horizontal position begins where the flat position ends.
As we rotate the plate clockwise (see below figure), the plate approaches the nominal horizontal position.
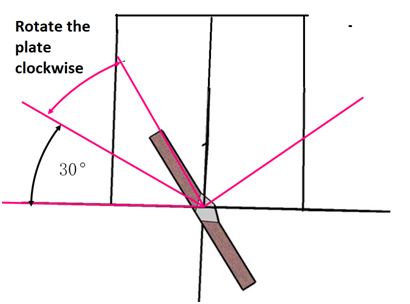
The horizontal position continues till we have crossed the nominal horizontal position by 10°. See figure below.
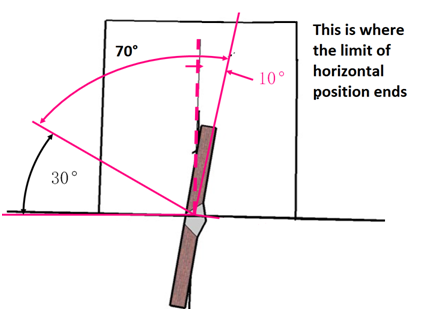
If we rotate past this (in clockwise direction), the position can then no longer be called as horizontal (it would then be called overhead position).
Here is how the rotation of face would look like in isometric view.
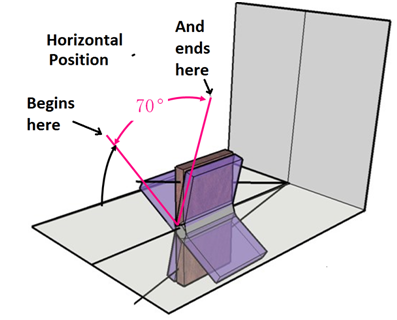
In summary, the horizontal position begins when the plate is 30° to the horizontal plane, and ends when the plate is 10° past the vertical. The expanse of the horizontal position is spread across 70°.
This rotation is applicable for all inclinations of axis from 0° to 15° shown in figure 13 above.
Compare this with the measly 15° rotation permitted for 2G position.
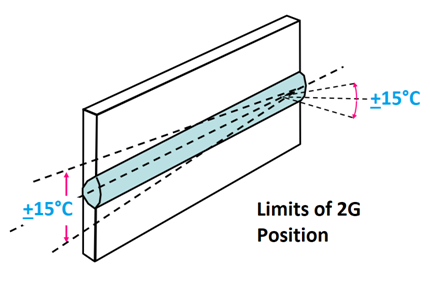
Moral of the story is that 2G position and horizontal are NOT equivalent. In fact, they are quite different.
To reiterate what was said above, 2G is merely a standard test position – in which a 15° rotation from the nominal position is permitted for both inclination of axis and rotation of face. Whereas, in horizontal position – the limits permitted for inclination remain 0° to 15° only, but a rotation of face spread across 70° (beginning with 30° to horizontal plane and ending with 10° past the vertical) is permitted.
This makes horizontal position have a greater expanse as compared to the 2G position.
4G Position vs Overhead Position
What about Overhead Weld Position? Is it same as 4G Position?
The 4G position and overhead position are not the same thing. Let us see how they are different.
The nominal overhead position looks like this. This is same as the 4G position. Note that the weld is done from the underside of the plate. That is, the face of the weld points downwards towards the earth.
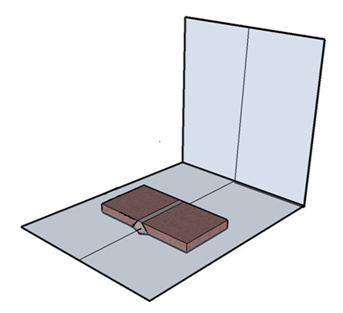
The axis is allowed to vary from 0° to 80°. That is, the position continues to be called as overhead till the inclination of axis becomes 80°. See the figure below.
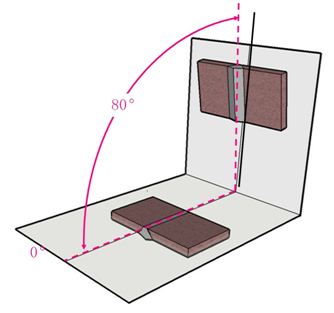
In other words, if the axis is inclined by more than 80°, then the position can no longer be called as overhead. It would then become vertical position.
How much is the face allowed to rotate, about the weld axis? Let’s see.
The face is allowed to rotate between 0° to 80° and 280° to 360°, per QW-461.1.
Let’s see how the overhead position looks like when the face is rotated.
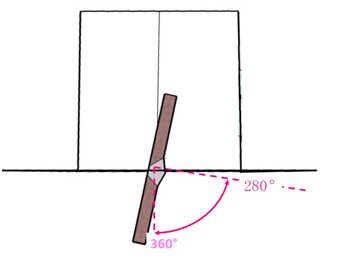
As the plate is rotated counter-clockwise from the basic overhead position, it can be rotated by a maximum of 80° as shown in the above figure. At this point, the angle of plate from the vertical plane is 10°.
If the face is rotated by more than this amount – the position can then no longer be called as overhead (it then becomes horizontal position).
Note that the overhead position begins where the horizontal position ends. As discussed above, the horizontal position ends when the plate is at an angle of 10° to the vertical.
A similar rotation in the clockwise direction would correspond to the 0° to 80° values given in the QW-461.1. See the figure below.
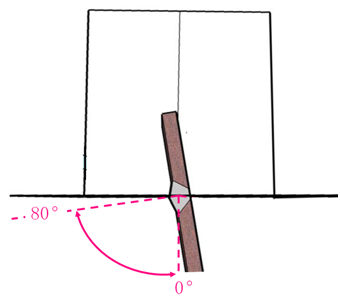
In isometric view, this is how the rotation of face would like, at its’ extreme limits.
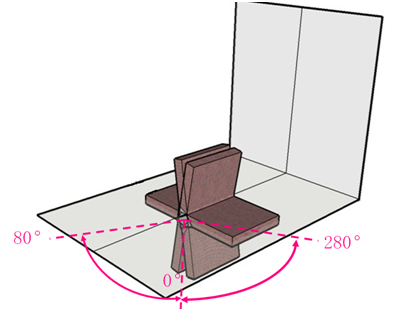
The composite of overhead position, taking into account the limits of both the inclination of axis and the rotation of face, would look like this.
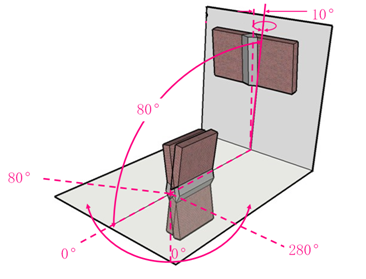
Compare this with the meagre 15° limits permitted for the 4G position.
In 4G position, only a +15° deviation is permitted in the inclination of axis, and a +15° rotation is permitted for rotation of face.
The moral of the story is that 4G and overhead are not same.
3G Position vs Vertical Position
Are 3G position and Vertical Position Same?
As you may have caught the drift by now, these two are not same either.
Vertical position is somewhat complex than the other positions. So it is divided into two parts.
Vertical Position – Part 1
The angle of inclination varies from 15° to 80°. See the figure below. Note that the face of the weld is upward.
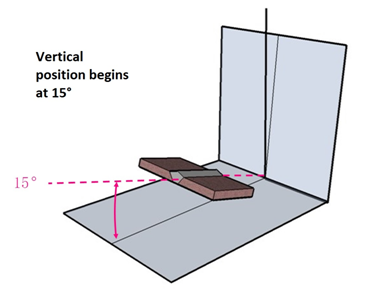
As can be seen in the figure above, the vertical position begins when the angle of plate is 15° to the horizontal plane. Recall that when this angle is below 15°, the position becomes flat position.
As this angle increases, the plate approaches vertical. The limit of inclination of axis extends up to 80°. See figure below. Note that the face of the weld is on the other side, that is – away from us.

How much is the rotation of weld face allowed? Let’s see.
The limits specified for rotation of face are 80° to 280°, per QW-461.1.
Hold the inclination of axis at 15°. See the figure 26 above. Now rotate the plate clockwise. How would the plate look like, on rotation?
It looks like this.
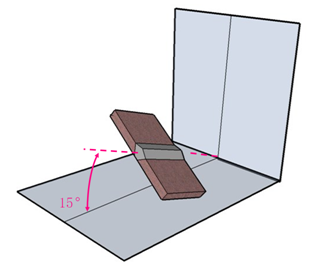
How much can we rotate this plate before we stop calling it vertical? Well, we can rotate by an angle of 100°, such that the plate makes an angle of 10° with the vertical. See the figure below. At this point, the ‘normal’ lying perpendicular to the plate makes an angle of 280° with the reference. This is the 280° specified in QW-461.1.
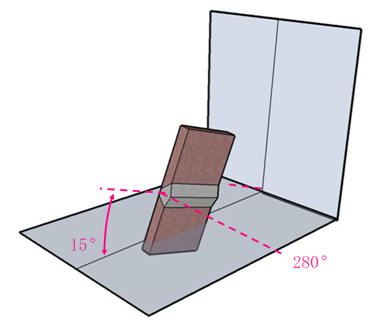
A similar rotation is permitted in the opposite direction too. That would correspond with the 80° limit specified under QW-461.1 for vertical position.
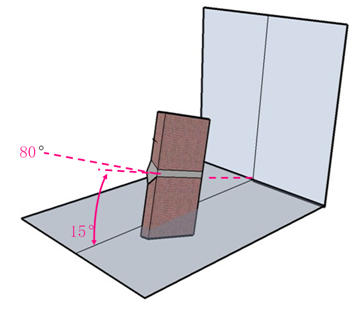
So, in total – the plate has rotated by an angle of 200 degrees – 100° on one side, 100° on the other side. Note that the inclination of axis is held constant at 15° in above figures. This rotation is allowed for all inclinations of axis from 15° to 80°. All of these positions are called vertical positions.
We can see that a vast number of positions fall under the vertical position. That is, the expanse of vertical position is greater than any other.
However, what happens when the angle of inclination exceeds 80°? Well that forms part II of the vertical position.
Vertical Position – Part 2
See the figure below. This is the limit for inclination of axis for vertical position part 1 as discussed above. When the inclination exceeds 80°, the position is still called vertical. However, the only difference is that a greater degree of rotation is allowed for the weld face than the vertical position part 1.
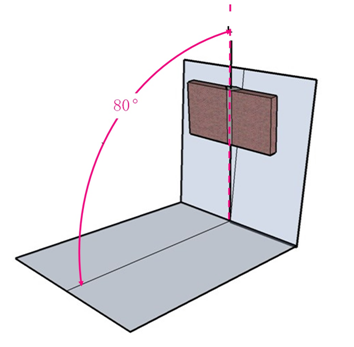
The limits of inclination of axis for vertical position part 2 extend between 80° to 90°. When the inclination becomes 90°, the resultant position is the nominal vertical position, which is also the nominal position for 3G, and which is also the most familiar vertical position.
The rotation of face allowed is full. That is, a full rotation from 0° to 360° is permitted. See figure below for an illustration of when the face is rotated at this inclination of axis.
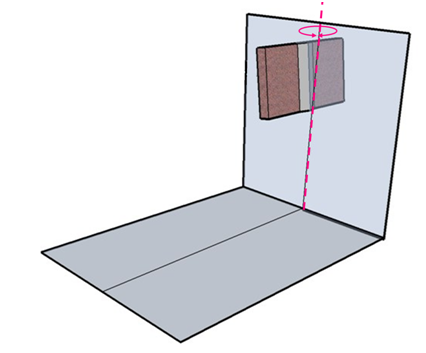
This 360° rotation is permitted for all inclinations of axis between 80° to 90°. All the resultant positions would be called as vertical.
Now compare the expanse of vertical positions (both part 1 and part 2 above) with that of 3G. The 3G position is merely the nominal vertical position, plus a deviation of +15° is permitted for both inclination of axis and rotation of face.
So, the moral of the story is – 3G and vertical position are not equivalent terms. The 3G position is merely a subset of the vertical position.
How to Specify Weld Positions on Production WPSs?
Some welding engineers specify welding positions on the WPS format as 1G, 2G, etc. This is not appropriate. Instead, the positions should be described as flat, horizontal, etc.
Although, weld position for procedure qualification has become a moot point, after the 2019 edition of Section IX onwards. Before 2019, there was some restriction on welding position when toughness was a consideration. That is, it was a supplementary essential variable (under QW-405.2).
However, in 2019 edition of Section IX, this variable has been deleted. Now, weld position is not at all a variable for procedure qualification. That is, a PQR in any position can support production welds in any other position. So, welding engineers like me can get away with writing ‘ALL’ for addressing the QW-405 on the WPS format.
However, writing ‘ALL’ is not the most appropriate way to address this variable. See, the WPS is for providing direction to the welder. Writing ‘all’ does not provide any meaningful guidance to the welder. So, instead, a more appropriate way of addressing this variable would be by writing ‘flat/horizontal/vertical/overhead’ or ‘F/H/V/O’, etc.
Weld Positions On Welder Qualification Record
How Should Positions Be Specified on Welder Qualification Record?
As discussed above, the test position of the welder should be recorded as 1G, 2G, etc. Under the range qualified column, the positions should be described as ‘flat’ or ‘horizontal’, etc. as applicable. The qualified positions for welder qualifications can be looked up in QW-461.9.
So, this was all I had to offer on the subject of welding positions right now. Please feel free to share your thoughts, observations in the comments section below. Thanks for reading!

hello, I also have a problem about the weld position , especialy the incline pipe, do you have some experience?
Hello. Yes. Please let me know your issue.
These are some of the most mis0understood and abused “terms” in the welding industry as a whole. Even printed posters from major welding companies add to the confusion by grouping test positions and welding positions together.
Your site content is great…besides the ads…but I understand.
Hello. Thanks for your comments. Indeed, very few people seem to know the difference between test positions and weld positions.