
Welding of pipes is commonplace. Pipes are used for transporting oil, water, gas, etc. The pressure inside the pipe may range from a vacuum pressure to gage pressure running into several hundreds of pounds per square inch. For such joints, mechanical joints such as rivets, threaded joints, etc. are not adequate for the purpose, hence welding becomes necessary. In this article, we shall touch upon a few aspects of pipe welding such as steps involved in making a pipe weld, welding positions in pipes, multi-pass welding in pipes, and various processes used for pipe welding.
Welding allows us to achieve a joint of leak proof and high strength. Also, a welded joint has lesser weight, and lowers the cost of installations. The welding of pipes is commonly done by various electric arc welding processes such as SMAW, FCAW, GTAW, GMAW, SMAW, etc. depending upon the pipe diameter and thickness.
Preparation For Pipe Welding
When a pipe needs to be welded, it first needs to be beveled to obtain the right edge preparation. Before that, we may also need to do cutting of the pipe depending upon the situation. After that, the pipe must be cleaned, a correct fit-up with backing rings and tack welds. Before all these, the welding position and welding process should be established for making the joint.
We shall discuss below a few of the steps involved in making welds in pipes:
Pipe Beveling
The right edge preparation between the two parts is important to obtain the necessary strength in the joint.
Usually, in base metal thicknesses up to ¾ inch (19 mm), a 32.5° angle on both sides with a root face of 1/16 inch (1.6 mm), such that a V-groove is formed, is sufficient. For heavier pipes, a U groove is preferable.
Cutting Of Pipe
Before welding, cutting of the pipe is sometimes necessary to meet a specific length requirement. If cutting is done in a work shop, saw cutting is possible. However, if cutting is done in a field setting, oxy-acetylene is one of the few feasible options.
The cutting should be done in a true circle, perpendicular to the centerline of the pipe. This can be done by marking on the surface of the pipe using a soapstone pencil. For this purpose, a heavy paper, or leather belting, or sheet gasket material with edge longer than the circumference of the pipe can be used.
The material is wrapped around the pipe, and overlapped. And marking is done along the edge of the material. After cutting the beveling of the pipes can be done using a oxy-acetylene cutting torch, or any other suitable means. The angle of cutting may be 30°-35°, with a small amount of root face.
Cleaning Of Pipe
For obtaining good quality weld, proper cleaning of the surfaces to be welded is very important. Before welding, the beveled surfaces must be made free from all rust, oxides, dirt, scale, and any other foreign matter. If beveling has been done using oxy-acetylene cutting, the residual oxides on the cut surface must be compulsorily removed before welding can be commenced.
Cleaning can be done using any suitable means such as a file, wire brush, grinding, buffing wheel, etc. Cleaning on the inner diameter side is equally important as the outer side and the beveled surfaces. Care should be taken to clean the beveled surface, as well as some length on both the inner surface as well as outer surface.
Aligning The Joint
A proper fit-up of the joint contributes substantially to the final acceptability of the joint for the application. A correct alignment, and tack welding such that the alignment does not get disturbed due to tack welding is therefore important.
For alignment, one of the ways is to use a line-up clamp. The ends of the two pipes can be securely held in this clamp. After insertion in the clamp, a root spacing should be ensured. For oxyacetylene welding, a root spacing should be approximately 1/8 inch (3.2 mm). For arc welding, the root spacing depends on the diameter of the filler rod to be used.
The root spacing should be at least equal to the diameter of the filler rod.
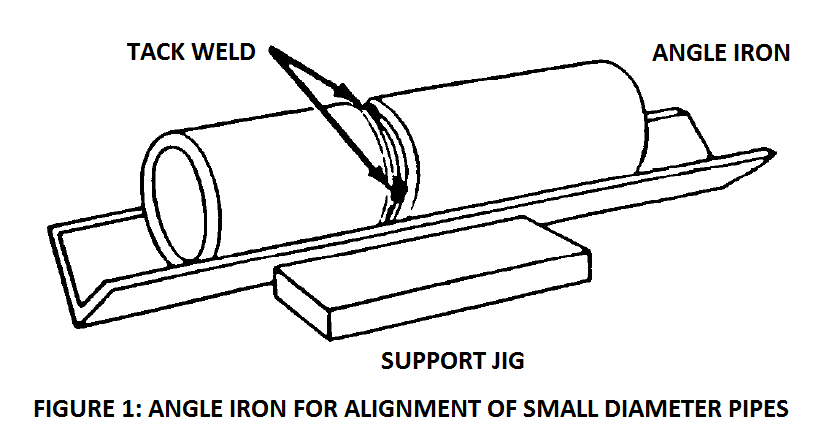
In order to align the pipes straight, if a pipe line-up clamp is not available, a jig may be developed. The function of the jig is to ensure that the centerlines of the two pipes coincide, and the root spacing in the joint is uniform throughout the circumference of the joint. For small pipe diameters, an iron angle as shown in the figure below can serve as a simple jig. For higher diameters, one may need to use section of channel or I-beams to obtain a satisfactory fit-up.
When a backing ring is used at the root, the root spacing should be at least as much as the diameter of the filler rod to be used for the root pass. Backing ring allows us to make full penetration joints. Its’ use however is sometimes not permitted due to other design factors. A brief discussion on the use of backing rings is given below.
Backing Rings And Tack Welding.
Backing rings enable complete penetration of the joint, while avoiding excess penetration at the root. Using backing ring also prevents any metal entering the ID of the pipe through a burn-through, or spatter sprayed around during the welding.
Backing rings also help in physically aligning the two pipes with their centrelines aligned to each other. During fit-up, the backing ring is inserted inside one of the pipes, and the second pipe is inserted over the backing ring. However, use of backing ring is sometimes restricted by design factors.
When design requires a smooth undisturbed flow of fluid inside the pipe, then backing ring is not permitted.
Backing rings are of several types, as shown in the following figure.
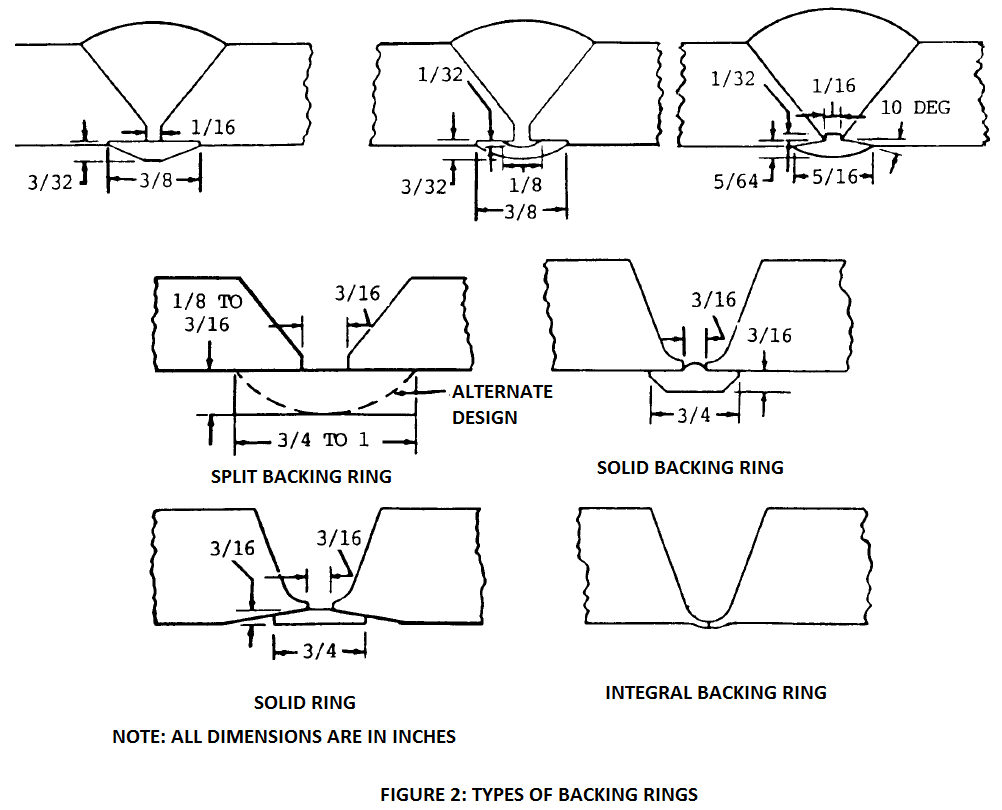
Sometimes, instead of a backing ring – consumable inserts are also used. Consumable inserts of different types such as Y-type, or a flat type, or inverted – T type, etc. The inserts are classified under SFA 5.30 of ASME Section II Part C of Boiler and Pressure Vessel Code.
The backing rings or consumable inserts are generally made of the same material as the pipe material.
Once the backing ring is in place, tack welding is done at four to six places around the circumference. Number of tacks depend on pipe diameter. Large pipes may require up to even eight tack welds. The tack welding holds the pipes in place without letting the alignment getting disturbed due to shrinkage stresses exerted by the root passes.
Pipe Welding Positions
The welding position of the pipe is dictated by the condition of the hob. The welder usually does not have much say in it. Sometimes, the pipe may be fixed, and some situations may allow the welder to roll the pipe such that all welding can be done in flat position.
We discuss below the normally used welding positions in pipe welding:
Horizontal Pipe Rolled Weld
In this position, the joint is tack welded at four to six equally spaced locations around the weld. Besides the tack welds, bridge pieces and/or wedge pieces may also be used around the circumference. These pieces are important when it is required that the distortion due to the weld be kept to a minimum.
In this type of welding, the job is mounted on two rollers, usually motor driven.
When manually welding, either with oxy-acetylene torch or with arc welding electrodes, the welding is commenced at the point C as shown in the figure, and proceeded towards B. The position at the point C is almost vertical. As we approach towards the point B, the position approaches flat position. The angle of the oxyacetylene torch or the manual electrode should be altered to compensate for this change.
When this is completed, the pipe is rotated by operating the rollers, such that the point B now occupies the earlier position of C. And again a pass is laid.
This keeps on repeating till the entire circumference is covered. Once the first pass is laid, the second pass is deposited in a fashion similar to the first pass, and so on, till the entire thickness is filled.
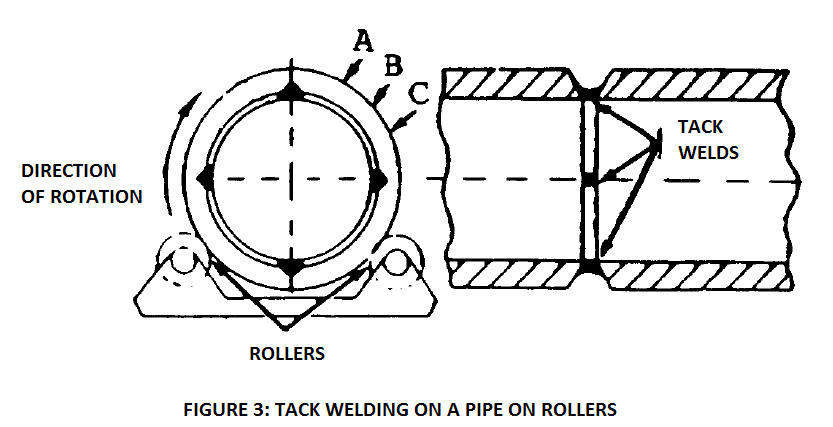
If the thickness of the pipe is less than ¼ inch, a single pass is enough to fill the thickness. When the thickness excess a quarter of the inch, it is best to make a multipass weld.
Horizontal Pipe Fixed Position Weld
In this position, the pipe is fixed with its’ axis in a horizontal position parallel to the ground.
Like the horizontal rolled pipe weld position, in this position too – the joint is fit-up, and tack welded at four to six locations. After tack welded, the position should not be disturbed.
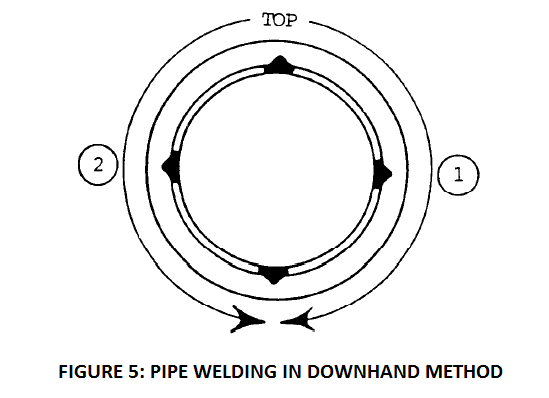
Now, welding can be done in two ways, as indicated in figures 4 and 5 below.
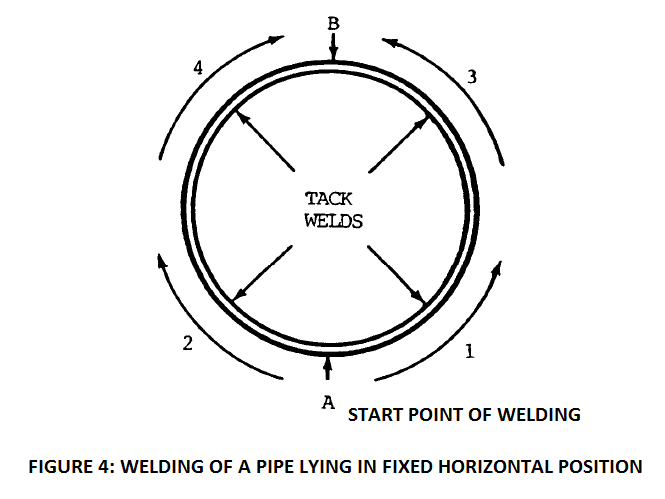
In the method shown in the above figure, welding is done in a sequential manner. The sequential fashion is followed to minimize the distortion. If no sequence is followed, the distortion may disfigure the joint in a manner that the centers of the pipes at the two free ends would be out of concentricity with respect to each other.
In ideal condition, the concentricity of the centers at all four points of both pipes should have zero shift with respect to each other. That is, all four points should lie in a straight line. However, distortion does not allow this to happen. In pipes of high diameters of the order of 100 inches, the concentricity shift can go up to several inches!
In order to arrest this distortion, sequential welding is one of the strategies. A suggested sequence, that follows four steps, is given below:
- Begin welding at 6 o’clock position and proceed towards 3 o’clock. Lay one pass of weld.
- In the next step, again begin welding at 6 o’clock position and proceed towards 9 o’clock position. Lay one pass.
- Subsequently, begin welding at 3 o’clock position, and proceed towards 12 o’clock position. Lay one pass of weld.
- Then, again begin welding at 9 o’clock position and proceed towards 12 o’clock position. Deposit one pass.
This finishes laying of one pass throughout the circumference. Follow a similar sequence in the subsequent passes too, and fill the entire thickness. A different sequence may be devised by the welding engineer based on the behavior exhibited by the joint during the course of welding.
Basically, the idea is to distribute the heat around the circumference so that too much of heat does not get concentrated in one place.
Another commonly used sequence is indicated in the figure 5 below.
In this sequence, welding is begun at 12 o’clock and proceeded towards 6 o’clock, through 3 o’clock. In the next step, welding is again begun at 12 o’clock and proceeded towards 6 o’clock. One pass is laid in both the steps.
Subsequent passes are deposited in a similar fashion till the entire thickness is filled.
When arc welding is used, welding speed is much higher in comparison to oxy-acetylene welding.
If thickness exceed a quarter of an inch, it is a good idea to use multi-pass welding, as the quality of the weld with a single pass is not likely to be good.
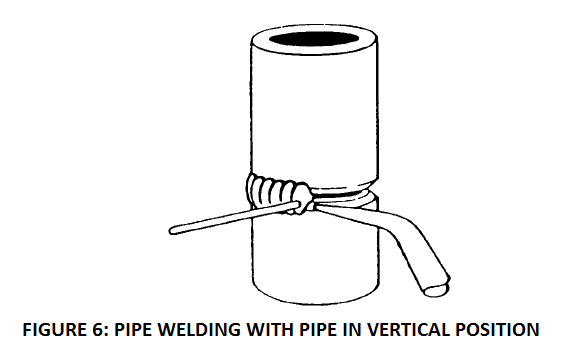
Vertical Pipe Fixed Position Weld
In this position, the pipes are position vertically such that the axis of both pipes is vertical, perpendicular to the ground. The welder goes around the pipe welding around the outer diameter of the pipe.
No rotation of the pipe occurs. And welding may be done continuously till the thickness is filled.
Multipass Arc Welding In Pipes
Root Beads
In multi-pass welding, root beads are deposited with the pipe line-up clamps on. Root welding requires greater skill than subsequent passes. Care should be taken such that proper root fusion is achieved, without excess penetration.
When backing ring is used, care should be taken to ensure that complete fusion with the backing ring is achieved. The root bead should be deposited as much as the liners of the line-up clamp permit. Once the root beads are deposited, the clamp can be removed, and subsequent thickness can be filled.
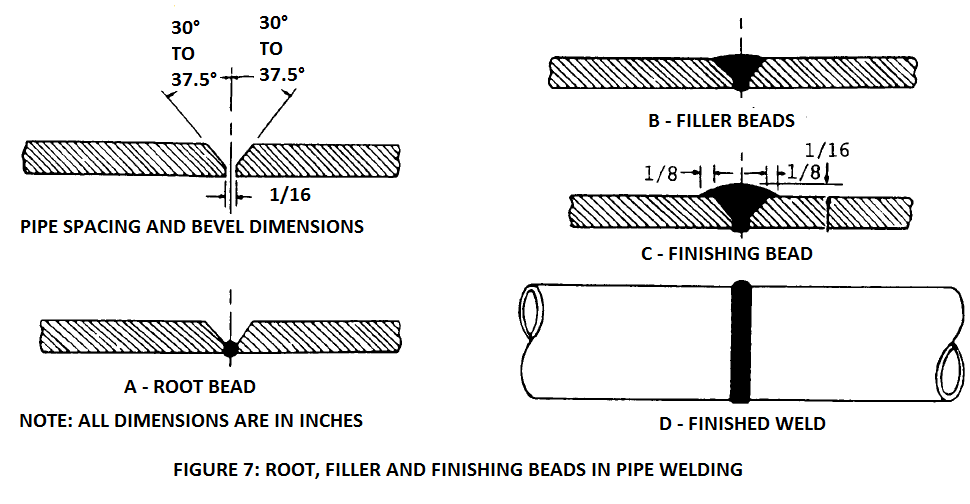
Filler Beads And Finishing Beads
While depositing the filler bead(s), care should be taken to achieve complete fusion with the side walls as well as the root pass. This allows fusion of any undercut caused by depositing the root pass.
The finish beads are applied at the end, and are usually applied with a slight weaving action. See the figure above.
Pipe Welding Processes
Oxy-acetylene welding and shielded metal arc welding are the most commonly used processes for welding of pipes, especially when welding needs to be done in field. In shop, other processes such as gas metal arc welding, flux-cored arc welding, submerged arc welding, etc. may also be used.
Oxyacetylene welding equipment is less expensive than a SMAW welding machine; also, it does not require availability of electrical power. So, oxyacetylene welding process is used when such constraints are available, especially when the pipe thickness is low.
When pipe thickness is high, SMAW process is normally used. Due to its’ maneuverability and versatility (stick electrodes are available for almost all kinds of metals), SMAW finds wide usage.
The following paragraphs discuss a little about SMAW process and oxyacetylene welding process for pipe welding.
Shielded Metal-Arc Pipe Welding
When welding is required to be done on pipes made of metals that are difficult to weld with other processes, SMAW is normally used. This includes metals such as aluminum, magnesium, and high-chromium nickel alloys.
The number of passes depends on the thickness of the base metal, size of the electrode and welding current used. In out of position welds though, the number of passes is higher. This is because the welder deliberately limits the size of the bead to control it.
The sizes of stick electrodes used are 1/8 inch to 5/32 inch (3.2 mm to 4 mm) for the root pass. For filler passes, electrodes of diameter 5/32 inch (4 mm) may be used. For finish passes, electrodes of diameter 3/16 inch (4.8 mm) may be used. Use of smaller diameter electrodes allows us to limit the heat input and achieve grain refinement.
Manual Oxyacetylene Pipe Welding
Manual oxyacetylene welding is used when the thickness of the pipe is low. The number of passes depends on the pipe thickness, pipe thickness, and welding position of the pipe.
So this was a little about pipe welding. Please share your thoughts in the comments section below.