
In this article we shall see some basics of TIG welding stainless steel, commonly used fillers used for various grades of stainless steel. This is followed by a few hands-on tips to achieve a good TIG weld on stainless steel. This is followed by a small discussion on how to avoid distortion and cracking in stainless steel.
Introduction
Known as 300 series, austenitic stainless steels are the most commonly welded. These chrome nickel steels, in contrast to lower-cost stainless have more alloys and are “non magnetic” (Exception, types 310 – 330). Austenitic grades of stainless steel typically contain a minimum of 16-26% chromium and 6-22% nickel.
308 Grade stainless steel, for example, is also referred to as 18-8 stainless steel and contains about 18% chromium and 8% nickel.
Austenitic stainless steel can be hardened by cold working, but not by heat treatment. In the annealed condition, all are nonmagnetic, although some may become slightly magnetic by cold working. At room temperature, the 300 Series stainless steels retain an austenitic microstructure.
While resistance to corrosion is their principal attribute, they are also selected for their excellent strength properties at high or extremely low temperatures. They are considered to be the most weldable of the high-alloy steels. Comparatively, little trouble is experienced in making satisfactory welded joints if their inherent physical characteristics and mechanical properties are given proper consideration.
The principal criteria for selecting stainless steel is usually resistance to corrosion, and while most consideration is given to the corrosion resistance of the base metal, additional consideration should be given to the filler material and to the base metal immediately adjacent to the weld zone.
Welding naturally produces a temperature gradient in the metal being welded, ranging from the melting temperature of the fused weld metal to ambient temperature at some distance from the weld.
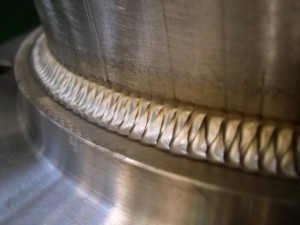
Because of the long-term cost-effectiveness and inherent corrosion resistance of stainless steel, it has become a staple material across many industries. TIG welding stainless steel poses a number of distinct challenges, the greatest of which are carbide precipitation and distortion. The key to preventing these issues is good heat control, correct travel speeds, and adequate gas coverage.
Basics Of TIG Welding Stainless Steel
In comparison with the welding of mild steel, for example, the austenitic stainless steels have several characteristics that require some revision of welding procedures that are considered standard for mild steel. The melting point of the austenitic grades stainless steels is lower, so less heat is required to produce fusion.
300 Series stainless steel electrical resistance is higher than that of mild steel so less electrical current (lower heat settings) is required for welding. These stainless steels also have a lower coefficient of thermal conductivity, which causes a tendency for heat to concentrate in a small zone adjacent to the weld.
The austenitic stainless steels also have coefficients of thermal expansion approximately 50% greater than mild steel, which calls for more attention to the control of warpage and distortion in the heat-affected zone.
During the TIG welding of stainless steels, the temperatures of the base metal adjacent to the weld reach levels at which microstructural transformations occur. The degree to which these changes occur, and their effect on the finished weldment in terms of resistance to corrosion and mechanical properties, depends upon alloy content, thickness, filler metal, joint design, weld method, and welder skill.
Regardless of the changes that take place, the primary objective in TIG welding stainless steels is to provide a sound joint with qualities equal to or better than those of the base metal.
To ensure success when TIG welding stainless steel, it is important to have good heat control, gas coverage and travel speeds.Typically, TIG welding stainless steel requires a DC power source and pointed tungsten (any type except pure).
Like aluminum or any metal to be welded for that matter, it should be free of oil, paint and/or dirt prior to welding to achieve optimal results. Stainless steel should be wire brushed between welding passes with a dedicated stainless steel wire brush that has not had contact with mild steel to help remove potential inter-pass oxides.
Filler rod is recommended on applications with a base material thicker than gauge 18 and will be contingent upon the joint design. For example, outside corners may not require a filler rod, but an inside joint will. Most TIG applications require overmatching of the filler rod. That is, a filler rod with higher strength properties should be used.
For example, on 304 series austenitic stainless steel, an ER308 rod should be used. Typically, austenitic stainless steel filler rods are available in diameters ranging from .035 to 5/32 (.9-to 4.0-mm) and are chosen according to the joint design, welding parameters, and applications.
Filler Rod Selection
Following filler rods are used as shown against various grades of stainless steels.
| Stainless steel | Filler Rod |
|---|---|
| 301 | 308 |
| 302 | 308 |
| 302S | 308 |
| 304 | 308 |
| 304L | 308 |
| 305 | 308, 310 |
| 308 | 308 |
| 309 | 309 |
| 309S | 309 |
| 310 | 310 |
| 310S | 310 |
| 314 | 310, 312 |
| 316 | 316 |
| 316L | 316 |
| 317 | 347 |
| 321 | 347 |
| 330 | 347 |
| 347 | 347 |
| 348 | 347, 348 |
Things To Keep In Mind When TIG Welding Stainless Steel
When TIG welding stainless steel there are a few points to keep in mind to achieve a cosmetically appealing and sound weld. Because stainless steel does not adequately dissipate heat, maintaining proper heat input when welding is critical. Too much heat can lead to warping, embrittlement, or rust. As little as five amps too much can damage stainless steel’s properties. There are, however, several ways to control heat input:
Good Fit-up
Adding filler metal to fill gaps puts more heat into the part, so a good fit-up is important. It’s impossible to add a lot of filler metal and keep energy out of the part.
Choose Correct Filler Metal
The filler metal diameter should be thinner than the base metal. If it’s thicker than the base metal, too much heat is needed to melt the filler metal. The filler metal should also match the base metal alloys in order to maintain consistent mechanical and corrosion properties.
Choose Right Tungsten Size
You can’t weld precisely on 1/16-in. material with a 1/8-in. tungsten. Use the right tungsten diameter based on your amperage.
Use Correct Tungsten Geometry
The tungsten’s shape plays a role in the weld’s width and penetration. In TIG welding stainless steel, the sharper the tungsten, the wider and less penetrating the bead will be. On a sharper point, (ground to a taper length that is more than 2½ times the electrode diameter), the arc tends to fan out, creating a wider heat-affected zone.
With a blunter point (less than 2.5 times the electrode diameter), the arc comes straight down with less flaring for a deeper, thinner bead and thinner heat-affected zone.
Use Fingertip Or Foot Control
You need to be able to start the arc and adjust the amperage from the beginning to the end of the weld. Set the welder to the desired amperage, which should be just a bit more power than you’ll need. If your welder is fairly accurate, you’ll only need to adjust the fingertip or foot control a little bit to adjust welding output.
Start With Low Amperage
Start with low amperage and allow the puddle to form. Then back off two or three amps and add filler.
Maintain Correct Puddle Size
The weld puddle should be the thickness of the base metal. If the puddle grows too large, turn down the heat. Eliminate craters by easing down the current at the end of the weld and adding filler metal until the puddle solidifies. Use your torch’s fingertip or foot pedal control or your welder’s sequencer.
Keep the gas flowing and directed at the puddle until the orange color fades. The post flow also cools the puddle and the tungsten. Moving the torch too fast can blow the gas away from the tungsten, turn it black and make it more difficult to start next time.
Use Pulsing
To control heat input, use a welder with DC pulsing capabilities. In pulsing, the current transitions between a high peak amperage and a low background amperage that maintains the arc but allows the puddle to cool. The peak current provides good penetration, but the background current allows the weld puddle to cool slightly, preventing warping, embrittlement, and carbide precipitation.
Pulses Per Second (PPS)
This is simply how many times the machine will complete one pulsing cycle in a time span of one second. Increasing the number of pulses per second produces a smoother ripple effect in the weld bead, narrows the weld bead. Reducing the number of pulses per second widens the weld bead.
Pulsing also helps agitate the puddle and release any porosity or gas trapped in the weld. For TIG welding stainless steel, use a pulse rate of 100 to 500 PPS. Start at 100 and work upward. Higher pulsing (generally above 100 pulses per second) increases puddle agitation, which in turn produces a better grain molecular structure within the weld.
High-speed pulsing also constricts and focuses the arc. This increases arc stability, penetration, and travel speeds, and it produces a smaller heat-affected zone.
Finishing the Weld
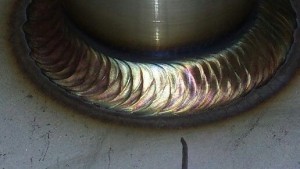
Stainless steels, in particular, 304 and similar materials, are widely used in food, dairy, drug, and processing equipment. To prevent bacterial growth, all fractures, cracks, and crevices in the weld should be removed, and exposed surfaces are ground and polished to match the parent metal. If welds are made in pre-finished stainless steel, the weld beads should be held to a minimum size to avoid excessive and expensive finishing costs.
The chrome-nickel grades are more difficult to grind than the straight chromium grades, so weld metal deposits should be as flat as possible. The heat from grinding should be held to a minimum also to avoid distortion of thin gauge materials. If the grinding wheels or belts were used previously on carbon steel, chemical cleaning should follow to remove any iron particles that might have become embedded in the stainless steel surface.
A technique of butt-welding polished sheets from the reverse or unpolished side has been successful. Sheets are first sheared from the backside so that any “shear drag” is on the polished side. Full penetration of the joint is achieved with a minimum of welding alloy penetrating the polished side. Relatively light grinding can then be used to prepare the weld on the polished side for final polishing and blending with the surrounding area.
Here’s a good tig welder for stainless steel –

TIG Welding Stainless Steel: Gas Coverage
Using the appropriate type and amount of shielding gas is an important way to prevent carbide precipitation when TIG welding stainless steel. Typically, pure argon provides the best results when welding thinner austenitic stainless steel, but the addition of small percentages of helium is not uncommon when better penetration and faster travel speeds are desired, especially on thicker pieces.
The average flow rate required is between 15 to 20 psi, anything greater will cause turbulence in the gas flow and weld puddle and result in a poor weld. The use of a gas lens is really recommended when using TIG welding for stainless steel. A gas lens is a copper and brass component with layered stainless steel mesh screens that replace the collet body in a standard TIG torch.
The gas lens helps distribute gas more evenly around the tungsten, arc, and weld puddle and provides good cooling action. Full penetration welds require back purging. Covering the back of the weld with shielding gas ensures that the underside of the weld is protected from atmospheric elements and can be done with commercial apparatuses or individually manufactured methods.
The use of Chill Bars. The successful welding of stainless steel by various welding methods depends to a large extent on the type of backup bar or plate used. Experience has indicated that pure copper is the most satisfactory material for backing up a weld. The high heat conductivity of such a backup bar or plate will prevent its sticking to the weld metal, while its chill-mold effect will assure a clean smooth weld metal surface. Copper backup bars can be made by cutting pieces from a copper plate or sheet. Chill bars serve the best purpose by controlling distortion on light gauge material and also help to prevent excessive burn-through or melting of the base metal.
Finally, remember to maintain adequate post-flow. The best practice is to maintain one second of post-flow for every 10 amps of welding current used during welding.
Avoiding Distortion and Cracking when TIG Welding Stainless Steel
Because stainless steel is prone to greater thermal expansion than other materials it tends to distort easily. Too high of a current setting and/or too slow of travel speeds contribute to this problem. Thermal expansion occurs because the HAZ (heat-affected zone) on austenitic stainless steel is more localized than with other materials.
When the weld cools, there is slow thermal transfer to the surrounding material that can lead to buckling. By clamping, using a fixture, or adequately spaced tack welds, especially on thin gauge material, you can reduce the chances of buckling. Along with distortion comes the potential for cracking.
By using a joint design consisting of a V-grove, modified V-grove, U-grove of a J-grove that limits the number of weld passes and the amount of heat applied the chance of cracking will be reduced. Cracking will also occur in the weld initiation and crater area. One way to prevent cracking in this area is to use run-on/run-off tabs.
These tabs need to match the base material for the best results. The tabs provide an area to ‘run-on’ or ‘run-off’ the weld thus eliminating arc starting and craters on the actual weld joint and can be easily ground or cut off after the weld cools.
Remember: even with the right type and amount of gas, good heat input, and proper travel speeds, training and practice are still the best defense against the pitfalls of TIG welding stainless steel.
It was a great tip when you said that post-flow should be adequately maintained when welding a stainless steel. My father wants to open is own construction firm, because he’s confident that he can help people with his expertise. That being said, I’ll make sure to help him find the best welding supplier in the city.